Saturday, December 17, 2011

51. Explain Drupal User, Permission, Role in Drupal

Every visitor to your drupal site, whether they have an account and log in or visit the site anonymously, is considered a user to Drupal. Each drupal user has a numeric user ID, and non-anonymous users also have a user name and an email address. Other information can also be associated with drupal users by modules; for instance, if you use the core Profile Drupal module, you can define user profile fields to be associated with each drupal user.

Anonymous drupal users have a user ID of zero (0). The drupal user with user ID one (1), which is the user account you create when you install Drupal, is special: that user has permission to do absolutely everything on the site.

Other users on your site can be assigned permissions via roles. To do this, you first need to create a role, which you might call "Content editor" or "Member". Next, you will assign permissions to that role, to tell Drupal what that role can and can't do on the site. Finally, you will grant certain users on your site your new role, which will mean that when those users are logged in, Drupal will let them do the actions you gave that role permission to do.

You can also assign permissions for the special built-in roles of "anonymous user" (a user who is not logged in) and "authenticated user" (a user who is logged in, with no special role assignments). Drupal permissions are quite flexible -- you are allowed to assign permission for any task to any role, depending on the needs of your site.

Saturday, December 10, 2011

50. Which are the files in a typical drupal theme and their purpose

A drupal theme is a collection of files that define the presentation layer. You can also create one or more "sub-themes" or variations on a drupal theme. Only the .info file is required, but most themes and sub-themes will use other files as well. The following diagram illustrates the files that are found in a typical drupal theme and sub-theme.

DRUPAL 6


DRUPAL 7

theming requirements

.info (required)

All that is required for Drupal to see your theme is a ".info" file. Should the theme require them, meta data, style sheets, JavaScripts, block regions and more can be defined here. Everything else is optional in drupal theme.

The internal name of the theme is also derived from this file. For example, if it is named "drop.info", then Drupal will see the name of the theme as "drop". Drupal 5 and below used the name of the enclosing folder of the theme.

Info files for themes are new in Drupal 6. In version 5, .info files were used solely for drupal modules.

template files (.tpl.php)

These drupal templates are used for the (x)HTML markup and PHP variables. In some situations they may output other types of data --xml rss for example. Each .tpl.php file handles the output of a specific themable chunk of data, and in some situations it can handle multiple .tpl.php files through suggestions. They are optional, and if none exists in your drupal theme it will fall back to the default output. Refrain from having complex logic in these files. In most cases, it should be straight (x)HTML tags and PHP variables. A handful of these templates exist in directories where core and contributed modules exist. Copying them to your drupal theme folder will force Drupal to read your version.

Note: The theme registry caches information about the available theming data. You must reset it when adding or removing template files or theme functions from your theme.

template.php

For all the conditional logic and data processing of the output, there is the template.php file. It is not required, but to keep the .tpl.php files tidy it can be used to hold preprocessors for generating variables before they are merged with the markup inside .tpl.php files. Custom functions, overriding theme functions or any other customization of the raw output should also be done here. This file must start with a PHP opening tag "

Sub-themes

On the surface, sub-themes behave just like any other drupal theme. The only differences is that they inherit the resources from their parent themes. To create one, a "base theme" entry inside the .info file is needed. From there it will inherit the resources from its parent theme. There can be multiple levels of inheritance; i.e., a sub-theme can declare another sub-theme as its base. There are no hard set limits to this.

Drupal 5 and below required sub-themes to be in sub-directories of the parent theme. This is no longer the case.

Others
  • The logo and screen shot is not absolutely necessary for the theme to function, but it is recommended, especially if you are contributing your theme to the Drupal repository. Screenshots will show inside the theme administration page and the user account settings for selecting themes when the appropriate permissions are set. See the screenshot guidelines for more information.
  • To supply administrative UI settings or "features" beyond logo, search, mission, etc., a "theme-settings.php" file can be used. This is an advanced feature. More information can be found in the Advanced settings handbook page.
  • For color module support, a "color" directory with a "color.inc" file is needed along with various support files.
  • If you want to base your work on a core theme, use sub-theming or make a copy and rename the theme. Directly modifying Bartik, Garland or Minnelli is strongly discouraged, since they are used for the install and upgrade process.
  • All non-Core or modifications to Core themes should be installed under the "sites/all/themes" directory to keep them separate from core files. If you plan to run multiple sites from a single Drupal code base, you can make a theme available to a specific site rather than all sites; read about how to set this up in Multi-site installations.

49. Compare Joomla and Drupal Terminology

  1. Joomla Template is called Theme in Drupal.
  2. Component = Module.
  3. Module = Block.
  4. Mambot/Plugin = Input filter.
  5. Menu-Horizontal = Primary Links
  6. Menu-Vertical = Navigation
  7. Dynamic Content Item = Story
  8. Static Content = Page
  9. Back-end = there is no back-end in Drupal,
  10. SEF = Clean URLs (but some docs refer to SEF, too).
  11. Section = Taxonomy Vocabulary/Term
  12. Section Title = Taxonomy Term (master)
  13. Category = Taxonomy Term (child)
  14. Introtext = Teaser
  15. Maintext = Body (see explanation below)
  16. Pathway = Breadcrumb

Other terms are the same, such as: forum discussion, editor, search, region, comment, subject/title, preview, html tag, view, edit, advertising/banner, log in/log out, profile, avatar, access control, logs, cache, site maintenance, RSS feed, parent-child and snippets.

48. Name a few Good drupal sites.

http://www.economist.com/

http://www.howtodothings.com/

http://leadel.net/

http://www.cargoh.com/

http://www.symantec.com/connect/


For a comprehensive list of drupal success stories follow the below link on drupal.org
http://drupal.org/success-stories

47. What are the technical differences between Joomla and Drupal -

  1. Joomla only supports one Section and one Category for each content, while you can assign Drupal contents to several Sections/Categories.
  2. Joomla does not support multi-site setups, whereas drupal supports multisite setups.
  3. Drupal has built-in forum discussion, so you don't need to install additional modules.
  4. The term Blog in Joomla is not same as blog in Internet dictionary. 'Blog' term in Joomla is actually a teaser view of contents containing: Title, Introduction and a Read More link. So, in short, 'Blog' in Joomla terminology is not 'Weblog'! If one is asking if Joomla supports a 'Blog' by default, then the answer is yes, but with a different meaning.
  5. Comments on contents are not available in Joomla by default, but Drupal supports comments for all content-types by default.

47. How to migrate your joomla site to Drupal site


46. How to Install Themes in your drupal website

  1. Download the theme.
    You can download drupal themes from http://drupal.org/project/themes, as well as some external sites like http://topdrupalthemes.net/, http://drupalthemesdownload.com/ , http://drupal2u.com/ , http://www.sooperthemes.com/drupal-themes , http://www.rockettheme.com/drupal-themes , http://fusiondrupalthemes.com/. Make sure the version of the theme matches your version of Drupal. Note that themes labeled "DEV" are in a development stage. They may be written for a previous/current/future version of Drupal, and they are considered unstable and should be handled with care.
  2. Extract the files.
    When you first get the theme, it will appear in a compressed file format such as 'tar.gz'. On Windows, use a program like 7-Zip to extract it. On the Mac, you can use Stuffit Expander. To extract the file using the Unix command line:
    tar -zxvf themename-drupalversionnumber.tar.gz
    You should see a list of files extracted into a folder.
  3. Upload the folder.
    FTP/Copy/SCP your files to the desired themes folder in your Drupal installation. Since the themes folder at the top level of Drupal is typically reserved for Drupal core themes, you should create a sites/all/themes/ directory and put uploaded themes there. If you are running a multi-site installation of Drupal, you can create a themes folder under sites/my.site.folder and put themes there that are specific to a particular site in your installation. Themes that will be shared between all sites should be placed in sites/all/themes.
  4. Read the directions.
    If the theme has an installation file (usually INSTALL.txt and/or README.txt), read it for specific instructions. There are themes that require special treatment to function properly.
  5. Enable the theme.
    Go to administer > site building > themes. Check the 'Enabled' box next to the theme.
  6. Optional: Make it the active, default theme.
    Check the 'default' box to make this the chosen theme for your site. Enabled alone will allow users to select the theme, if you have allowed that permission.
  7. Click the 'Save Configuration' button at the bottom.

If you run into problems, check the themes issue queue and search the forums. If your problem hasn't already been addressed, post a question and someone will try to help you out.

Sunday, December 4, 2011

45. How to Create Content in Drupal ?

To create content

Administration >> Content >> Add Content

Select the content type you want to create. There are usually one or more fields within each content type. We are providing an example of a page.

  • Title and Body fields are found in most content types.
  • Body is where you put the text for the page. "Input format" controls what code can go in the Body field. There are three (core) options: filtered HTML, PHP code, and full HTML. CCK allows you to change the name of this field; for example, you might call it "Product description."
  • Use the log message to provide information that might be useful to other authors who may edit your document later, or provide your rationale for making edits to your own or other people's content. The log message is not visible to users without the appropriate content editing rights.
  • Menu settings are used only if you are making this piece of content an item in one of your menus. It's the most efficient way to create menus. Another handbook section you may find useful is Working with the Menu.
  • Comment settings are probably best set at the site level (click Content management > Comments > Settings), but can be specified for an individual piece of content.
  • You can attach files to many content types. The "Upload" module must be enabled, and then the content type has to be set to allow this.
  • If you enabled the Path core module or added PathAuto, you'll have URL path settings next. You can enter a "normal" name here rather than being required to use "node/2" when you refer to it later on. PathAuto will automatically create a URL based on your page title.
  • Authoring sets the time stamp and creator information. The other use for this section is to control the page or story order when they are based on the time and date it was created.
  • Publishing options: only "Published" items show up on the website. You can also promote content to the front page and make the content item sticky to the top of lists.

The final step is to preview your content and to Submit your page.

44. How URL Aliases works in Drupal ?

Drupal has a feature called "URL Alias" that allows you to provide a more understandable name to the content. As far as browsers, servers, and search engines go, it is totally unnecessary. But for humans, it is nearly mandatory. This is why most consultants tell people to always turn on the Path core module, which supports URL aliasing.

You can administer the URL Aliases directly on the node edit or add forms, or by doing the following:

First, visit the page you created. In your browser's address field, you'll see its URL. On the end it will probably say "node/xxx" where xxx is some number. Write down that number. Now go to Administer > Site building > URL Aliases. There's an "Add Alias" tab at the top. In the top box, enter "node/xxx" from above. In the second box, enter "Newurl".

Automatic Alias Generation

If your site is going to have lots of content, particularly user-submitted content, you might want to look at the PathAuto module. Not only will this module automatically generate URL aliases for new content (according to rules you can set up), but can even go back and change aliases in bulk.

Permissions

After you enable the Path module, you need to give the appropriate roles permission to use it in admin/user/permissions. Scroll down to the Path module to enable "administer url aliases" and/or "create url aliases" permissions.

Tuesday, November 29, 2011

Drupal

Drupal

Come for the software, stay for the community

Drupal is an open source content management platform powering millions of websites and applications. It’s built, used, and supported by an active and diverse community of people around the world.

Drupal Home page : http://drupal.org/


Why choose drupal ?

Drupal is a free software package that allows you to easily organize, manage and publish your content, with an endless variety of customization.

Reasons are many,

Drupal is Open Source | Community Support | Commercial Services |Who's Using Drupal |Drupal CMS Features


Drupal Downloads
http://drupal.org/download


Drupal Groups

http://groups.drupal.org/


Drupal tutorials
http://www.siteground.com/tutorials/drupal-tutorial/


Drupal Wikipedia Page

http://en.wikipedia.org/wiki/Drupal

Saturday, November 5, 2011

42. What is Content Construction Kit (CCK) in Drupal

The Content Construction Kit allows you to add custom fields to custom content types using a web interface. In Drupal 5.x, custom content types can be created in Drupal core, and the Content Construction Kit allows you to add custom fields to any content type. In Drupal 7 and later, most of the functionality of CCK has been absorbed into Drupal core.

Summary and purpose of CCK?


Drupal comes with core content types like story and blog. For such a content type, go to 'Create content' and submit a new story or blog. That's sufficient for pages of pure text and with or without attachments.

But what if your users want to be able to submit reviews of their favorite aardvark? That would be a new content type, but I want to be able to display other stuff as well as a chunk of text for every node of that type, and I don't want it to be just attached file links.

My options: I could hack the story.module, OR I could see if someone has already created an aardvark.module for the exact type of content I want, OR using CCK I could create a new content type called Aardvark Review.

Using CCK, I can create a content type that has exactly the fields I need, no more or less. My Aardvark Review for instance might have:

text field (comments on the aardvark)
dropdown menu (aardvark color)
audio file (recording of the aardvark's grunting)
image (photo of aardvark)
The CCK admin interface for creating these new content types is nice and easy: just create your new type and then click through, adding the type of fields you want it to have and what their parameters will be (how much text for the review? which colors in the dropdown menu?). There are many add-ons available in the downloads section under CCK that add new kinds of fields to your options (video field, audio field, calculated values and vastly more complicated ones).

From the users' perspective, they'll just click on Create content > Aardvark Review and get a form that asks them to submit their review, the aardvark's color, a recording, and picture.


Module Download Page http://drupal.org/project/cck

Friday, November 4, 2011

41 The Drupal flow

If you want to go deeper with Drupal, you should understand how information flows between the system's layers. There are five main layers to consider:


At the base of the system is the collection of nodes—the data pool. Before anything can be displayed on the site, it must be input as data.
The next layer up is where modules live. Modules are functional plugins that are either part of the Drupal core (they ship with Drupal) or they are contributed items that have been created by members of the Drupal community. Modules build on Drupal's core functionality, allowing you to customize the data items (fields) on your node types; set up e-commerce; programmatically sorting and display of content (custom output controlled by filters you define); and more. There are thousands of different options within the fast-growing repository of contributed Drupal modules. They represent the innovation and collaborative effort of everyone from individuals to large corporations.
At the next layer, we find blocks and menus. Blocks often provide the output from a module or can be created to display whatever you want, and then can be placed in various spots in your template (theme) layout. Blocks can be configured to output in various ways, as well as only showing on certain defined pages, or only for certain defined users.
Next are user permissions. This is where settings are configured to determine what different kinds of users are allow to do and see. Permissions are defined for various roles, and in turn, users are assigned to these roles in order to grant them the defined permissions.
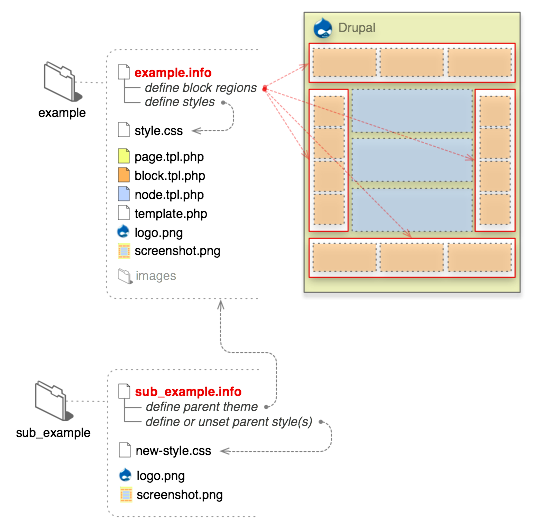
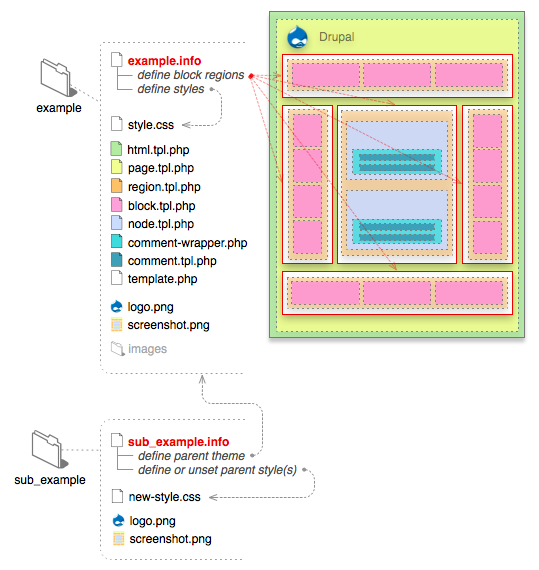
On the top layer is the site theme (the "skin"). This is made up predominantly of XHTML and CSS, with some PHP variables intermixed, so Drupal-generated content can go in the appropriate spots. Also included with each theme is a set of functions that can be used to override standard functions in the modules in order to provide complete control over how the modules generate their markup at output time. Templates can also be assigned on-the-fly based on user permissions.
This directional flow from bottom to top controls how Drupal works. Is some new functionality you want not showing up? Perhaps you uploaded the module into the system but have not activated it yet, and this is making everything downstream non-functional (as in "A" in the diagram above).

Maybe the module is installed and activated, but you still don’t see what you want on your site. Did you forget to place the block, as in "B"? Or are your user permission settings conflicting with what you want and your users are not set to see the output as in "C"?

Additionally—as mentioned earlier—getting the kind of granular control you want over the details of the XHTML module outputs requires understanding this flow. Are you using a module that does exactly what you want, only you wish the markup was just a little bit different? Maybe you’d like it to use different tags, or you’d like to assign a CSS class to something? You accomplish this by copying the output function from the module and pushing it up to the functions document in your theme. Modify the code there, and when the system goes to output, it will see your customized function and use that instead.